Submit eligibility checks - Manual
You can submit real-time eligibility checks manually through the Stedi portal. Manual eligibility checks are useful for testing and for situations when you need to do a one-time eligibility check.
Eligibility checks verify coverage with a specific payer. If you don't know the payer, you can perform an insurance discovery check instead to find a patient's coverage using their demographic data.
In the portal, you can:
- Run eligibility checks.
- Edit and retry failed eligibility checks and review the details of each attempt. With the Stedi Agent, you can resolve common recoverable errors automatically with the same best practices our Support team uses for troubleshooting.
- Use the Debug view to systematically troubleshoot failed eligibility checks until you receive a successful response from the payer.
Transaction enrollment
Transaction enrollment is the process of registering a provider to exchange specific healthcare transactions with a payer.
Most payers don't require transaction enrollment for eligibility checks. Those that do, such as the Centers for Medicare & Medicaid Services (CMS), typically allow multiple enrollments with different clearinghouses. That means enrolling through Stedi shouldn't cancel or interfere with any existing enrollments you have through other clearinghouses.
Enrolling through Stedi for real-time eligibility checks also doesn't affect your existing enrollments for other transaction types. For example, enrolling with Stedi won't unenroll the provider from receiving transactions like Electronic Remittance Advices (ERAs) through other clearinghouses.
You can check whether a specific payer requires enrollment for eligibility checks in the Payer Network or through the Payers API.
To enroll, complete the following steps:
- Create a provider record with the information required for enrollment. If you already have a record for the provider, you can skip this step. Stedi portal | API endpoint
- Submit an enrollment request for real-time eligibility checks. Stedi portal | API endpoint
Testing
The best way to test real-time eligibility checks is through mock requests. When you submit specific mock requests in test mode, Stedi returns mock benefits data from the specified payer.
To submit mock requests through the Stedi portal:
- Toggle Test mode to ON in the Stedi portal.
- Go to the eligibility check form.
- Choose from predefined mock requests for well-known payers, including Aetna, Cigna, UnitedHealthcare, and the Centers for Medicare & Medicaid Services (CMS).
For each mock request, Stedi returns a realistic mock benefits response for that payer so you can get a sense for the kinds of data you'll receive in production. The benefits responses include examples of copays, deductibles, and other patient payment responsibilities, as well as active coverage.
Visit Test mode to learn more about testing in the Stedi portal.
Mock transactions you send in test mode are free for testing purposes and won't incur any charges from Stedi.
Don't send fake data
Some payers, particularly CMS (HETS), prohibit sending test eligibility checks for fake patients or providers to their production systems. Payers may block your access if you send these types of test transactions.
You can send as many mock requests to Stedi as you need, but if you need to send test data to payers in production, you must contact Stedi support to coordinate with the payer and obtain approval. For example, some payers require that you use specific test credentials.
Run eligibility checks
Real-time eligibility checks provide a response in seconds. They're ideal for in-person patient visits, telehealth appointments, and other scenarios where you need immediate information about a patient's coverage.
To run a new eligibility check:
-
Go to the checks view or searches view.
-
Click + New eligibility check. Stedi opens the simplified eligibility check form, which we recommend for most use cases.
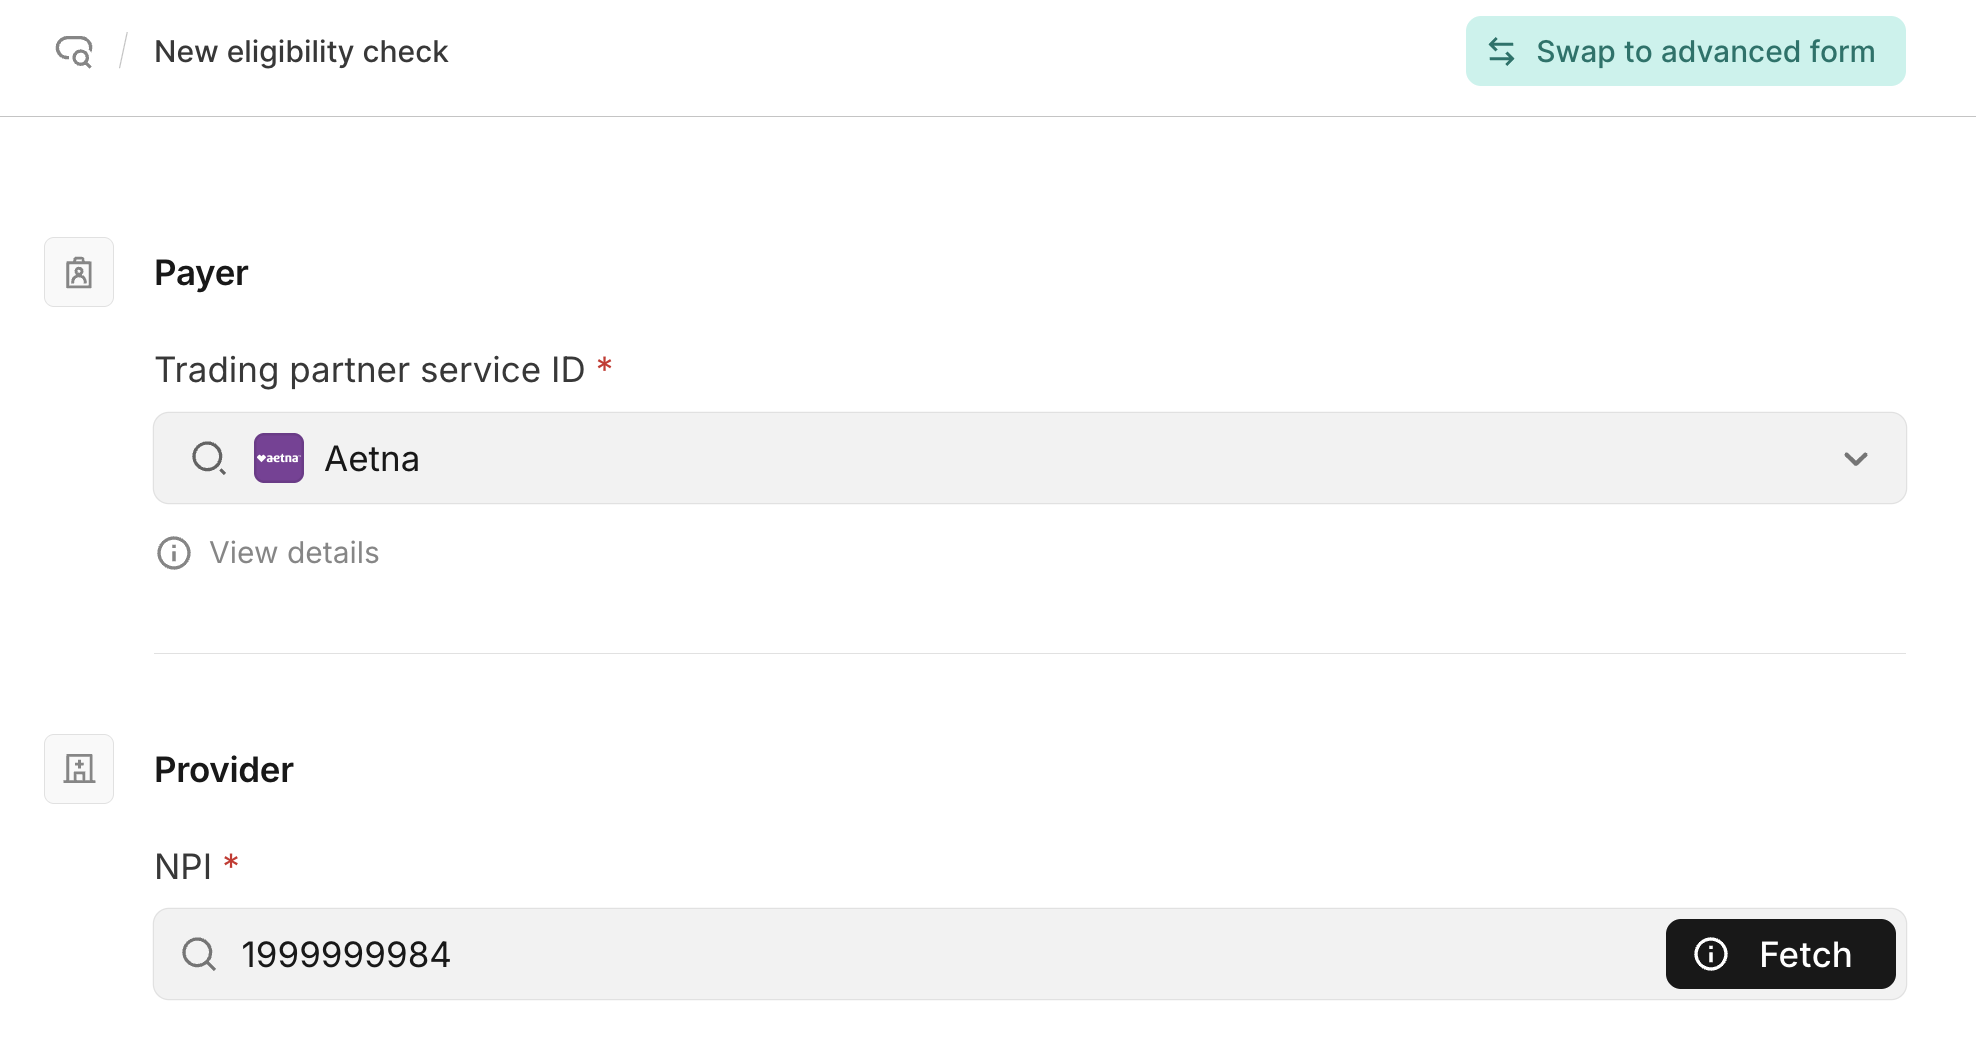
If you need to submit a check with additional information, click Swap to advanced form. On the advanced form, click Select fields on the top right of the window. The Select fields modal opens, where you can add additional form fields, such as the provider's Social Security Number (SSN) or procedure codes.
Check the boxes next to the fields you want to add to each section and click Save selection.

-
Complete the form. Review eligibility request fields for detailed instructions and tips for required fields. We especially recommend reviewing how to choose the right service type code (STC) or procedure code. This is very important for getting the best results from the payer.
-
Click Submit.
Stedi opens the Overview page for the eligibility check. If the check was successful, you can click Benefits to review the patient's benefits information.
Eligibility request fields
For the best chance of success, start by sending the smallest possible set of fields in your eligibility checks. Adding extra data can lead to unnecessary rejections.
We recommend starting with the following information. Only include more if the payer requires it.
| Form section | Instructions |
|---|---|
| Payer, or trading partner service ID | Select your payer from the provided list. Hover over view details to review a summary of the payer's various identifiers and open the full payer record in Stedi's Payer Network. |
| Provider | Most eligibility requests require the provider's name - either their first and last name (individual) or business name (organization) - and their National Provider Identifier (NPI). If you need to provide additional information, such as the provider's Social Security Number (SSN), click Swap to advanced form and then click Select fields to add additional fields to the request form. |
| Subscriber |
|
| Dependent | A patient qualifies as a dependent for eligibility checks when they are listed as a dependent on the subscriber's insurance plan and the payer cannot uniquely identify the patient through information outside the subscriber's policy. If the patient has their own member ID (even if it only differs by a suffix like 0), you must identify them in the Subscriber section instead.
|
| Encounter, service or procedure codes | You must include either a service type code (STC) or a procedure code and qualifier. This tells the payer what kinds of benefits information you're requesting. Most medical payers don't support procedure codes. Some dental payers do, but we recommend trying an STC first.
|
| Encounter, service dates | Stedi populates today's date as the date of service by default.
|
Patient information
Follow this guidance to help payers find the patient in their system.
Payer search requirements
All payers are required to be able to search for patients using the following "bare minimum" subsets of information. They will return benefits information as long as they can find a unique match for the patient within their system.
For a subscriber:
- Member ID, first name, last name, date of birth
- Member ID, last name, date of birth
- Member ID, first name, last name
For a dependent:
- Subscriber member ID, first name, last name, date of birth
- Subscriber member ID, last name, date of birth
- Subscriber member ID, first name, last name
Of course, not all of this patient information is always available. For example, a patient may forget their ID card. In these instances, some payers may still be able to search with even less information, such as the patient's first name, last name, and date of birth. Contact us if you have questions about alternative search options for a particular payer.
Dependents
The patient qualifies as a dependent for eligibility checks when:
- The patient is listed as a dependent on the subscriber's insurance plan.
- The payer cannot uniquely identify the patient through information outside the subscriber's policy.
When the patient meets these criteria, you should submit their information in the Dependent section of the form. Otherwise, you must submit their information in the Subscriber section instead.
For example, if the dependent has their own member ID number in the payer's database, you must identify them as a subscriber. This includes member IDs that differ only by a suffix, such as 01, because the patient can still be uniquely identified.
Medicaid dependents
Most Medicaid plans don't support dependents. However, some state Medicaid plans support eligibility inquiries for newborn children under 12 months old.
Children typically must be enrolled in Medicaid as a separate subscriber with their own unique member ID, even if they are legally the dependent of a parent who is a Medicaid plan member. Therefore, you'll almost always need to submit the child as a subscriber in the Subscriber section.
Sending dependent information to payers that don't support dependents will either cause an error, or the payer may ignore the information and return results for the subscriber instead.
Patient names
Note the following information and best practices when entering patient names:
- Enter the name exactly as written on the patient's insurance ID card (if available), including any special or punctuation characters such as apostrophes, hyphens (dashes), or spaces. If the patient's insurance ID card isn't available, enter the name exactly as written on a government-issued ID card. If a government ID card isn't available, enter the name exactly as given by the patient.
- Don't include a name prefix, title, rank, honorific, or academic degree in any field. These include Mrs., Dr., Hon., and PhD.
- Don't include a suffix or generation such as Jr. or III in the First name or Last name field. Put it in the separate Suffix field instead. Payers are supposed to automatically parse suffixes out of the last name, but Stedi can't guarantee that all payers will do this correctly.
- You can populate a middle name (or names) or initial in the Middle name field, but most payers ignore it when searching for the patient.
- Case doesn't matter. For example, JANE is equivalent to Jane.
The following are supported for patient names:
- Compound last and first names separated by spaces or hyphens such as Jean‐Claude or Smith Jones
- Apostrophized or elided names such as O'Connor or D'Amore
- Numbers like 3, however this typically indicates a data entry error
Some payers may have more specific requirements or restrictions that we don't cover in our docs. If you're receiving errors for a specific payer, we recommend consulting that payer's documentation for eligibility checks for additional guidance.
Retry failed eligibility checks
When an eligibility check fails, you can edit the request details in the portal and resubmit it until you get a successful response. There are three ways to retry a failed eligibility check: using the Stedi Agent, manually resubmitting the request, or using Debug view.
For information about common eligibility check errors and recommended resolutions, visit the troubleshooting guide.
Retry with the Stedi Agent
You can use the Stedi Agent to troubleshoot and resolve common recoverable eligibility check errors automatically. To use it, you must be at least an Operator role within your Stedi account.
To resolve an eligibility check failure with the Stedi Agent:
- Go to the checks view or searches view.
- Hover over a failed check or search to reveal the Resolve with Stedi Agent button. This button is only available for checks and searches with common recoverable errors.
- Click Resolve with Stedi Agent. The Stedi Agent opens a side panel in Debug view.
- The Stedi Agent analyzes the eligibility request and works through best practice recovery strategies based on the error type. For example, if the payer returned an error code
75(Subscriber/Insured Not Found), the agent may try different combinations of patient data or adjust the name format to find a match in the payer's system.
Each time the agent retries the eligibility check, it stores the new request in the same eligibility search record and it shows up in Debug view in real time. This allows you to see the history of attempts and the progression of the agent's troubleshooting efforts.
The agent only accesses data from the eligibility search it's working on. It can't access data from other searches, customers, or systems.
You can review past recovery attempts with Stedi Agent from the Chats page. These attempts are read only - you won't be able to send chat messages to the agent.
Manually edit and retry
To manually resubmit an eligibility check:
- From the checks view or searches view, click the eligibility check or search you want to troubleshoot to view its details.
- Click Actions > Edit and retry.
- Update the request details as needed, and click Submit.
You'll know the retry was successful when the status is either Active or Inactive. If the status is still Failed, you may want to try resolving in Debug view or using the Stedi Agent, if available.
Iterate in Debug view
Debug view is a workspace where you can systematically troubleshoot failed eligibility checks until you receive a successful response from the payer. For example, first you might try swapping the patient's nickname (Dave) for their full name (David) to see if that returns benefits information. In the next iteration, you might try submitting the request with a different service type code or dropping the date of birth.
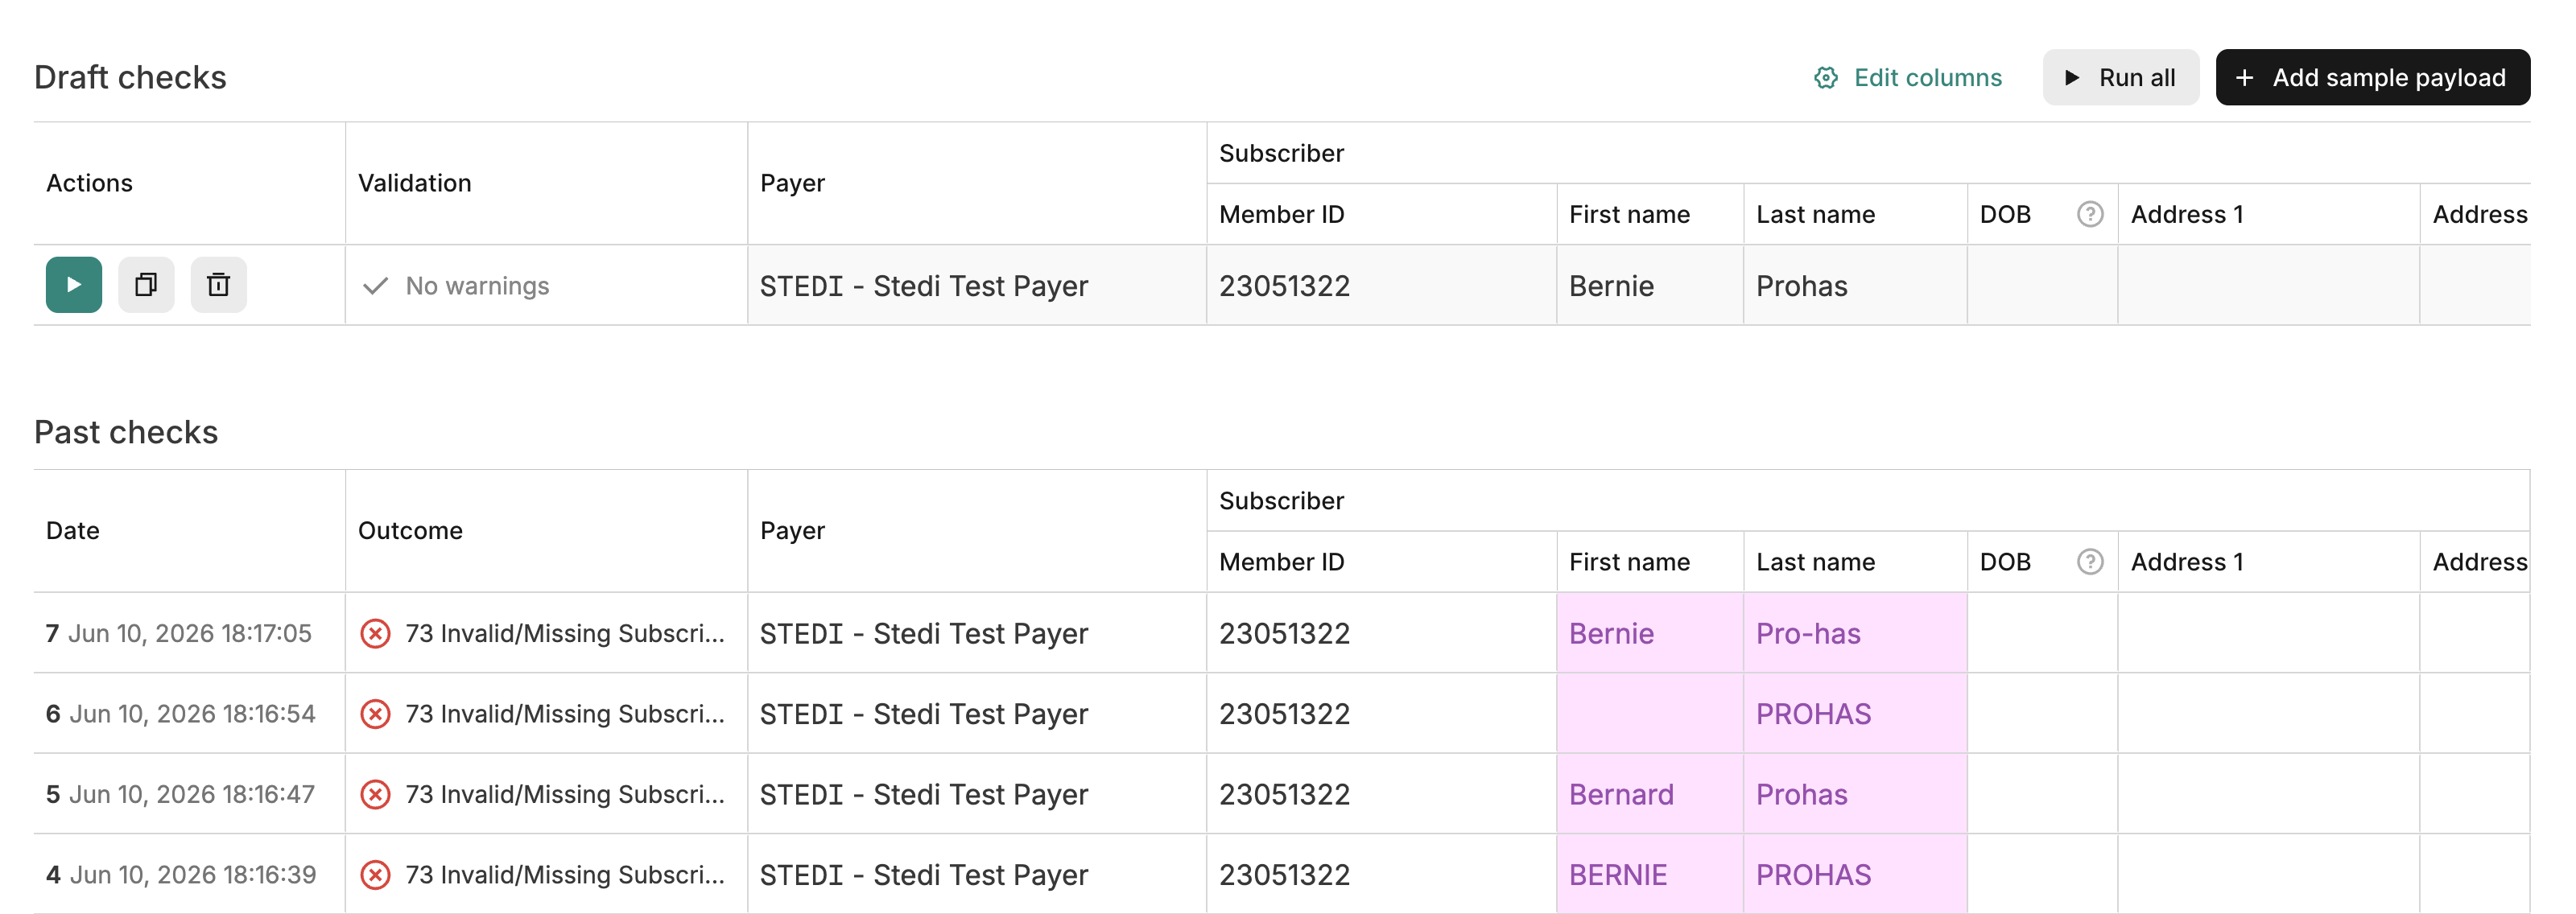
Debug view shows all past iterations of the eligibility check and highlights the differences between each new version of the request. You can also draft and submit new requests directly from this page. This format helps you understand what you've already tried and quickly iterate on failed requests.
To troubleshoot eligibility checks in Debug view:
- From the checks view or searches view, click the eligibility check or search you want to troubleshoot to view its details.
- Click Actions > Debug to enter Debug view.
- Click + Add draft to create a new draft request. Stedi pre-populates the draft with the details from the most recent eligibility check.
- Update the draft request as needed. Use the Edit columns list to show or hide specific fields in the request.
- Click the green arrow when you're ready to submit the updated eligibility check draft.
Stedi runs the check and moves it to the list of Past checks. Stedi highlights the differences between it and other past checks so you can see a clear record of your troubleshooting efforts. You can repeat this process as many times as needed to get a successful response.
CMS HETS Rules of Behavior
All parties involved in eligibility transactions sent to the Centers for Medicare & Medicaid Services (CMS) eligibility system, called HETS, must comply with the HETS Rules of Behavior. Compliance is also required under our terms.
Review the Rules of Behavior before sending eligibility checks to CMS.