

Run eligibility checks
You can run eligibility checks in the Stedi portal to verify a patient's insurance coverage and benefits. You can submit eligibility checks through the portal using:
- Agentic Discovery (recommended) - An automated workflow that runs eligibility checks, recovers from failures, and runs insurance discovery if needed.
- Standard eligibility checks - Stedi runs a single eligibility check with the information you provide. You're responsible for retrying and troubleshooting errors manually.
- MBI lookups - Retrieve a patient's Medicare Beneficiary Identifier when you don't know their MBI.
- Batch eligibility checks - Submit eligibility checks for multiple patients at once through CSV upload.
Before submitting eligibility checks, check whether your payers require transaction enrollment.
Transaction enrollment
Transaction enrollment is the process of registering a provider to exchange specific healthcare transactions with a payer.
Most payers don't require transaction enrollment for eligibility checks. Those that do, such as the Centers for Medicare & Medicaid Services (CMS), typically allow multiple enrollments with different clearinghouses. That means enrolling through Stedi shouldn't cancel or interfere with any existing enrollments you have through other clearinghouses.
Enrolling through Stedi for real-time eligibility checks also doesn't affect your existing enrollments for other transaction types. For example, enrolling with Stedi won't unenroll the provider from receiving transactions like Electronic Remittance Advices (ERAs) through other clearinghouses.
You can check whether a specific payer requires enrollment for eligibility checks in the Payer Network or through the Payers API.
To enroll, complete the following steps:
- Create a provider record with the information required for enrollment. If you already have a record for the provider, you can skip this step. Stedi portal | API endpoint
- Submit an enrollment request for real-time eligibility checks. Stedi portal | API endpoint
Transaction enrollment with the Stedi insurance discovery payer (payer ID: DISCOVERY) isn't required, but we strongly recommend it. Enrollment allows Stedi to run Medicare Beneficiary Identifier (MBI) lookups as part of insurance discovery checks, which can improve results when searching for Medicare coverage. Visit Manage transaction enrollments to learn how to enroll.
Agentic Discovery (recommended)
Agentic Discovery isn't available in test mode. If you want to send mock checks in test mode, run standard eligibility checks instead.
Agentic Discovery is the default and recommended way to run eligibility checks in the Stedi portal. It automates the entire workflow of finding a patient's coverage and benefits. You're more likely to successfully find coverage and get benefits details using Agentic Discovery than by running a single standard eligibility check.
When you start an Agentic Discovery check, the Stedi Agent runs an eligibility check. If the check succeeds, the workflow stops. If it fails, the agent automatically recovers the check using Stedi's best practices, such as trying permutations of the patient's demographic data. If recovery still fails, the agent runs an insurance discovery check to find coverage using the patient's demographic information. Insurance discovery checks can find coverage even if the original eligibility check had missing or incorrect information. For example, if the eligibility check used the wrong payer.
You can start an Agentic Discovery check from the portal in two ways:
- Click + New Agentic Discovery run in the checks view.
- Select Agentic Discovery on the Stedi Agent's Chats page.
These options open a form in the Stedi Agent where you can enter or update patient, provider, and payer details:
- Enter patient and provider information. Visit Required information for details about what to include.
- If you don't provide a date of service, the check uses today's date.
- If you don't provide a Service Type Code, the check uses
30(Health Benefit Plan Coverage). - If you don't provide a payer, the agent runs an insurance discovery check using the patient's demographic information.
- Click Submit to start the Agentic Discovery workflow.
The agent displays real-time updates as it works through the workflow, showing each step and its results.
Required information
You only need to provide:
- The patient's first name
- The patient's last name
- At least one of: the patient's date of birth, member ID, or Social Security Number (SSN)
- The provider's NPI
However, we recommend including as much patient information as you have, such as the state in the patient's address. Additional information increases the likelihood of finding active coverage.
Pricing
Stedi prices Agentic Discovery checks per agent run. Stedi doesn't bill you separately for the underlying eligibility or insurance discovery checks the agent performs. For pricing details, visit the Stedi pricing page.
Standard eligibility checks
Use standard eligibility checks when you're sure the patient's demographics are complete and correct or need to run mock checks in test mode. With standard checks, you manually specify all patient, provider, and payer information, and you're responsible for troubleshooting any errors that occur.
Real-time eligibility checks provide a response in seconds. They're ideal for in-person patient visits, telehealth appointments, and other scenarios where you need immediate information about a patient's coverage.
To run a standard eligibility check:
-
Click + next to All checks in the side navigation, then select New Agentic Discovery run.
In test mode and for accounts without Agentic Discovery, click + New eligibility check to open the eligibility check form directly. Continue to step 3.
-
Click Use the standard eligibility check form instead. Stedi opens the eligibility check form.
-
Complete the form. Click Swap to advanced form when you need to:
- Add additional provider identifiers (such as a Social Security Number).
- Specify that the subscriber is an organization or add extra subscriber fields.
- Use procedure codes, such as CDT or CPT, instead of service type codes.
- Submit a date range instead of a single date of service.
Review eligibility request fields for detailed instructions and tips for required fields, including how to add fields in the advanced form. We especially recommend reviewing how to choose the right service type code (STC) or procedure code. This is very important for getting the best results from the payer.
-
Click Submit.
Stedi opens the Overview page for the eligibility check. If the check was successful, you can switch to Benefits in the menu to review the patient's benefits information.
MBI lookup
A Medicare Beneficiary Identifier (MBI) is a unique, randomly-generated identifier assigned to individuals enrolled in Medicare. You must include the patient's MBI in every eligibility check you submit to the Centers for Medicare and Medicaid Services (CMS).
When patients don't know their MBI, you can perform an MBI lookup instead of a standard eligibility check. You can run MBI lookups through the eligibility check form or through bulk CSV upload.
Types of MBI lookups
There are two types of MBI lookups you can perform with Stedi. For each, you'll use a special payer that tells Stedi to perform an MBI lookup for the patient in addition to a standard eligibility check.
| Type | What's required | Payer |
|---|---|---|
| With SSN | first name, last name, date of birth, Social Security Number (SSN) | CMS MBI Lookup |
| No SSN | first name, last name, date of birth, U.S. state | CMS MBI Lookup Without SSN |
We recommend running MBI lookups with the patient's SSN whenever possible. When the SSN is present, the MBI lookup has a higher likelihood of successfully returning their MBI. MBI lookups with no SSN are a fallback option when the patient's SSN isn't available.
You don't need to include more patient demographic information than what's required, such as additional address data. It doesn't improve MBI lookup success rates.
Run an MBI lookup
To run an MBI lookup:
- Click + next to All checks in the side navigation, then select New Agentic Discovery run.
- Click Use the standard eligibility check form instead. Stedi opens the eligibility check form.
- Click Swap to advanced form.
- In the Encounter - Services section, set the System to STC and the Value to
30(Health Benefit Plan Coverage). - Set the Payer to either:
- CMS MBI Lookup for MBI lookups with SSN.
- CMS MBI Lookup Without SSN for MBI lookups without SSN.
- Complete the Provider fields with the provider's name and NPI.
- Complete the Subscriber fields with the required patient demographic data. You don't need to include more than the required fields, such as extra address data. Extra demographic data won't improve lookup success rates.
- With SSN: Specify that the subscriber is an individual under Name. Include the patient's first name, last name, date of birth, and SSN. Click Select fields, search for SSN under the Subscriber section, check the box to select it, and click Save selection to add the SSN field to the form.
- No SSN: Include the patient's first name, last name, date of birth, and U.S. state. Click Select fields, search for State under the Subscriber - Address section, check the box to select it, and click Save selection to add the State field to the form. You can leave the rest of the address fields blank.
- Click Submit.
Stedi uses the patient's demographic data and SSN to perform an MBI lookup. If there is a match, Stedi submits an eligibility check to CMS. Stedi returns a complete eligibility response from CMS for the patient and returns the patient's MBI as the subscriber's member ID.
Stedi automatically opens the Overview page for the MBI lookup when it's complete.
Medicare Advantage plans have their own unique member ID, which isn't returned in the MBI lookup response. You also shouldn't submit eligibility checks for Medicare Advantage plans to CMS (HETS) - you should submit them to the actual Medicare Advantage plan payer instead.
Outdated MBI error
Stedi's MBI lookup may rarely retrieve an outdated MBI for a patient. CMS may rotate an MBI for a member for various reasons at any time, such as to help protect against identity theft.
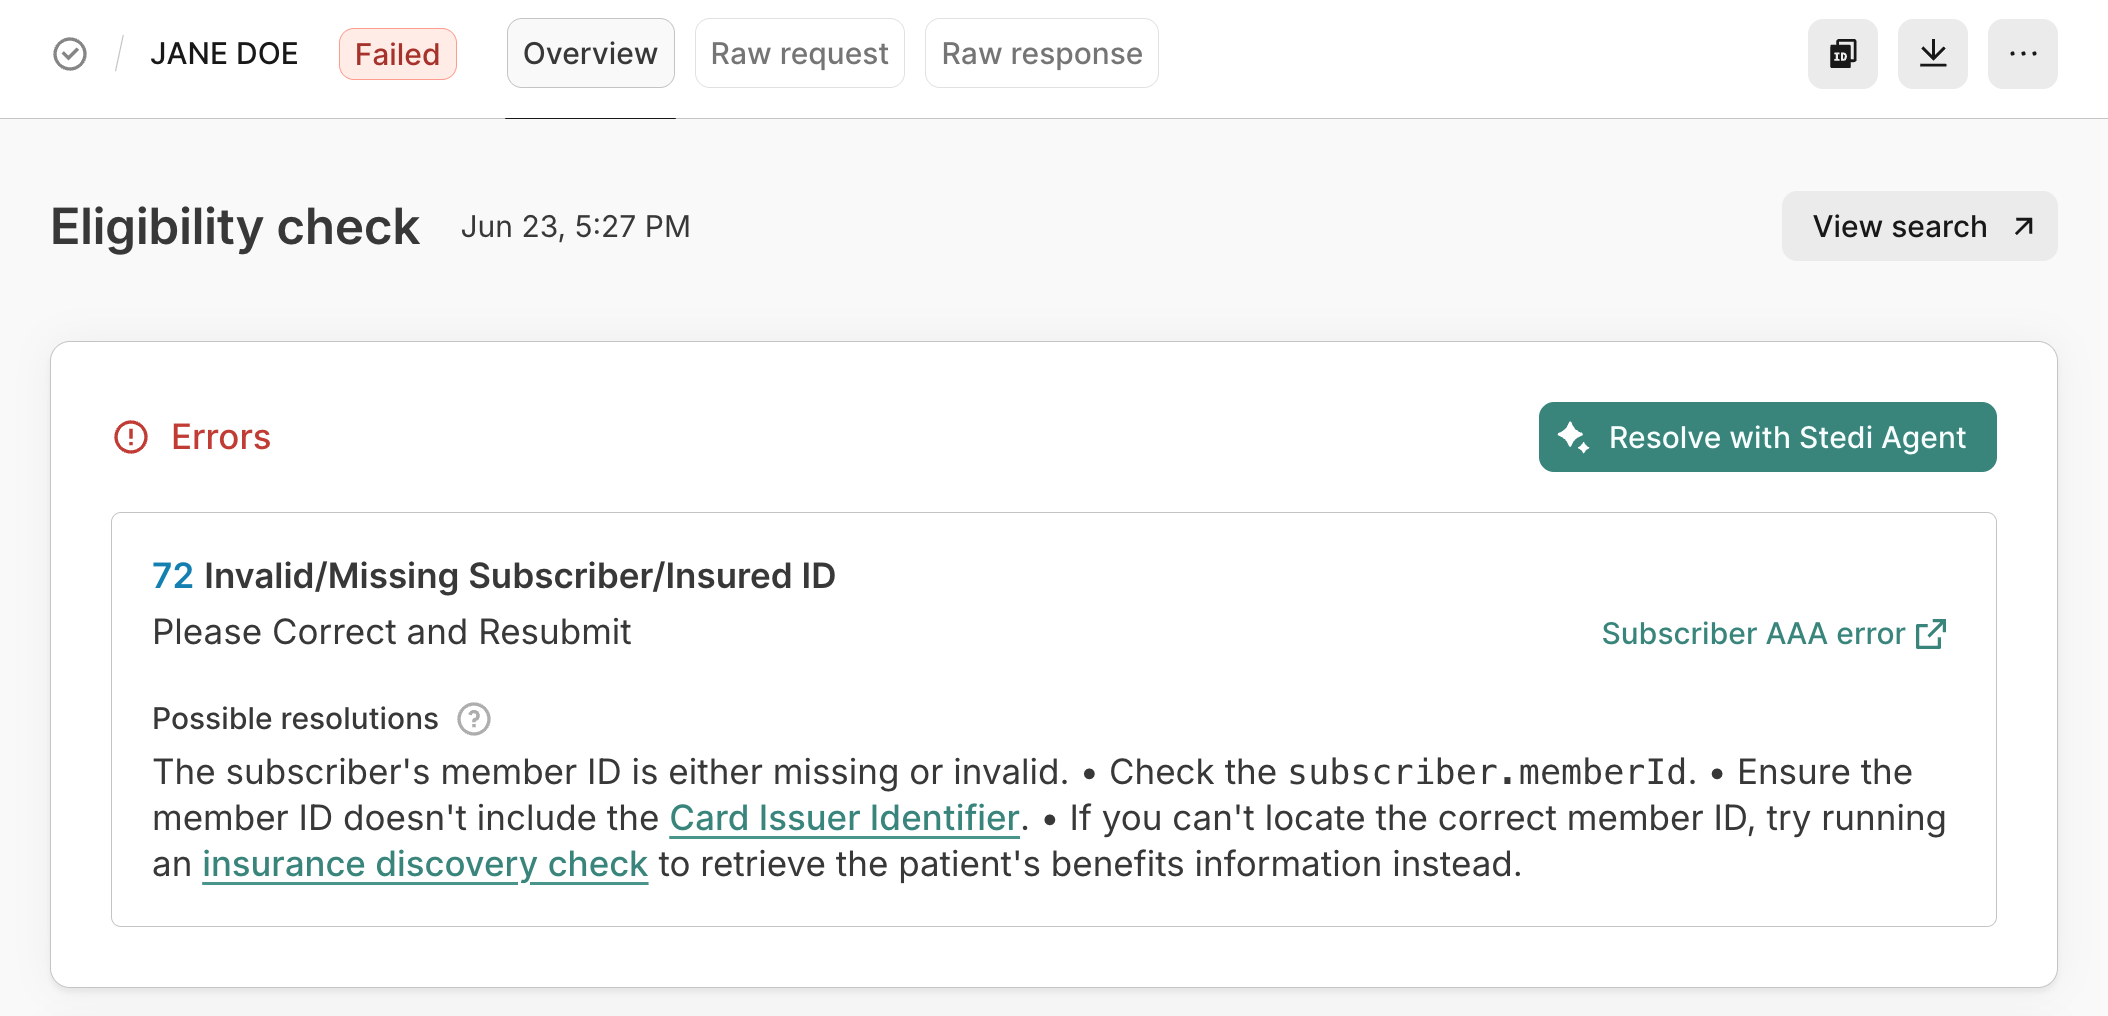
In these cases, the response will contain an AAA error with code 72 (Invalid/Missing Subscriber/Insured ID) and return a subscriber member ID, which is the outdated MBI.
Batch eligibility checks
Batch eligibility checks allow you to submit eligibility checks for multiple patients at once through CSV upload. We recommend using batch checks for bulk workflows that aren't time sensitive, such as monthly or weekly eligibility refreshes. You can submit batch eligibility checks and MBI lookups through CSV upload.
Create new CSV batch
To create a new CSV batch:
- Go to the Batch eligibility checks page.
- Click + New batch from CSV.
- Enter a unique name for the batch. Stedi displays this name in the list of batch uploads. This name is for your reference only - we don't send it to payers.
- (Optional) Click Advanced options to configure a custom Retry duration between 8 and 24 hours. This is the maximum number of hours that Stedi retries checks in the batch that fail due to payer connectivity issues. The default is 8 hours.
- Click Create to go to the CSV upload page for your new batch.
Upload CSV file
On the CSV upload page for your batch:
-
Click Download a template to download the CSV template with the supported fields. You can also download it from this link: template CSV file.
-
Populate the template with eligibility checks. Each row in the template represents one eligibility check. You can submit up to 10,000 checks per CSV file. The upload page contains detailed documentation for each possible field and recommendations for which fields to include for the best chance of success.
You can also submit MBI lookups through CSV upload. Set the
tradingPartnerServiceIdfor each check to eitherMBILU(for MBI lookups with SSN) orMBILUNOSSN(for MBI lookups without SSN). Then, include the required patient demographic information for each lookup. -
Click + Upload file to upload your complete CSV file.
-
Click Verify file so Stedi can validate the data in each eligibility check. You can fix any errors and re-upload the CSV file as many times as needed. When the file is error-free, you'll be able to execute the batch.
-
Click Execute batch to send the eligibility checks to Stedi for processing.
Stedi begins processing the batch.
Review batch progress
You can review the progress of submitted batches on the Batch eligibility checks page. The page displays each CSV batch you've submitted, along with it's name, date created, status, and total items (number of eligibility checks in the batch).
- The batch status changes to In progress while Stedi is processing the batch.
- The batch status changes to Completed when Stedi has sent all checks in the batch to payers and received responses.
- Most batches complete in 15 to 30 minutes. However, Stedi retries checks that fail due to payer connectivity issues for up to the configured retry period, so it can take up to the end of the retry period for all checks in a batch to return results.
Click a batch to view its details, including the status of each check in the batch. Click any eligibility check to go to its details page.
From the batch details page, you can also download the original CSV input by clicking Download under Original input file.
Retry failed eligibility checks
When an eligibility check fails, you can edit the request details in the portal and resubmit it until you get a successful response. There are three ways to retry a failed eligibility check: using Agentic Discovery, manually resubmitting the request, or using Debug view.
For information about common eligibility check errors and recommended resolutions, visit the troubleshooting guide.
Retry with Agentic Discovery
You can use Agentic Discovery to automatically find a patient's coverage when an eligibility check fails. Agentic Discovery runs an automated workflow that attempts to recover the failed check using best practices. If recovery fails, it runs an insurance discovery check to find coverage using the patient's demographic information. Insurance discovery checks can find coverage even if the original eligibility check had missing or incorrect information. For example, if the eligibility check used the wrong payer.
To use Agentic Discovery, you must be at least an Operator role within your Stedi account.
To retry a failed eligibility check with Agentic Discovery:
- Go to the checks view.
- Hold the pointer over a failed check to reveal the Launch Agentic Discovery button.
- Click Launch Agentic Discovery. This automatically starts the Agentic Discovery workflow using the details from the failed check.
The agent displays real-time updates as it works through the workflow, showing each step and its results. Stedi stores each retry in the same eligibility search record.
You can review past Agentic Discovery sessions from the Chats page.
Manually edit and retry
To manually resubmit an eligibility check:
- From the checks view, click the eligibility check you want to troubleshoot to view its details.
- Click Actions > Edit and retry.
- Update the request details as needed, and click Submit.
You'll know the retry was successful when the status is either Active or Inactive. If the status is still Failed, you may want to try resolving in Debug view or using the Stedi Agent, if available.
Iterate in Debug view
Debug view is a workspace where you can systematically troubleshoot failed eligibility checks until you receive a successful response from the payer. For example, first you might try swapping the patient's nickname (Dave) for their full name (David) to see if that returns benefits information. In the next iteration, you might try submitting the request with a different service type code or dropping the date of birth.
Debug view shows all past iterations of the eligibility check and highlights the differences between each new version of the request. You can also draft and submit new requests directly from this page. This format helps you understand what you've already tried and quickly iterate on failed requests.
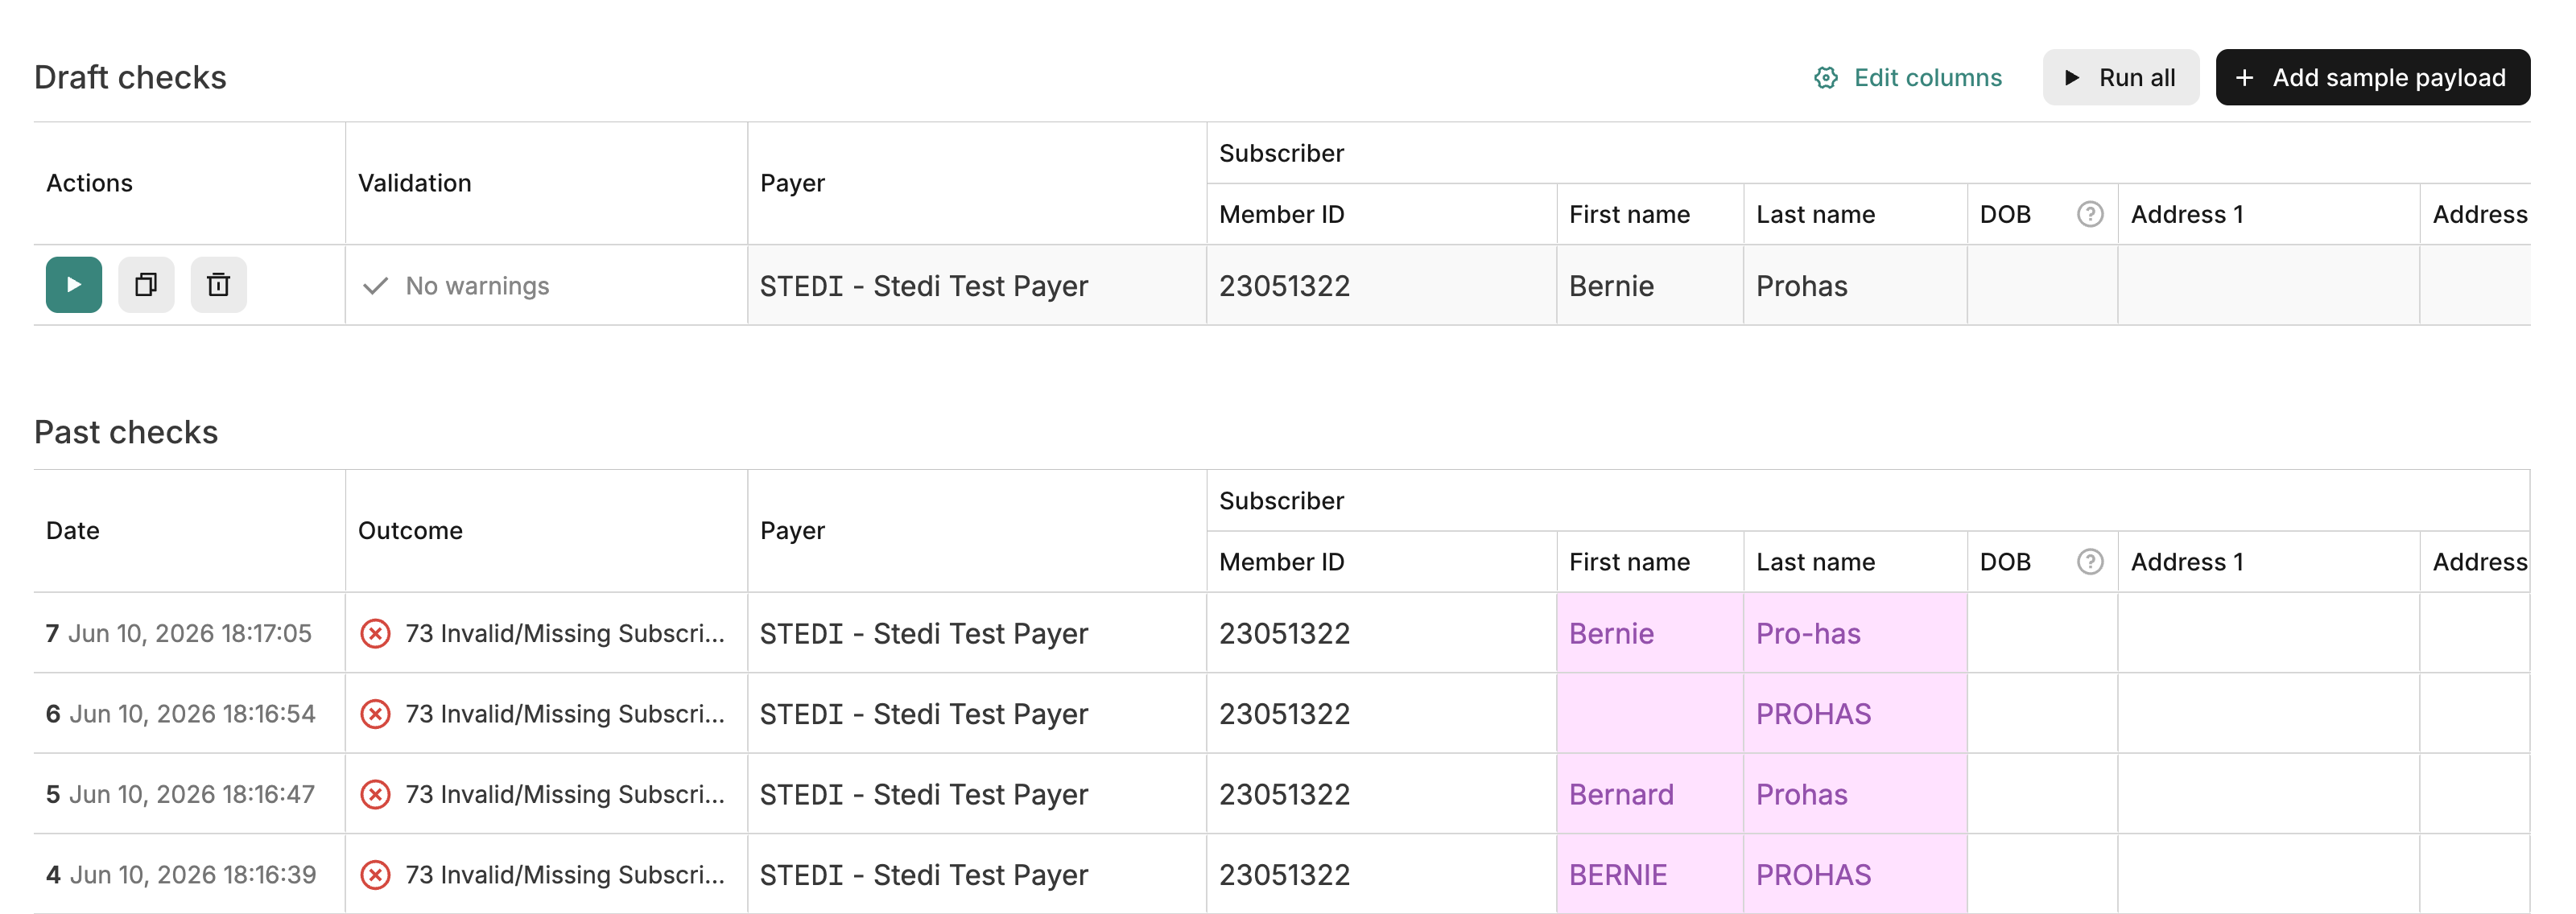
To troubleshoot eligibility checks in Debug view:
- From the checks view, click the eligibility check you want to troubleshoot to view its details.
- Click Actions > Debug to enter Debug view.
- Click + Add draft to create a new draft request. Stedi pre-populates the draft with the details from the most recent eligibility check.
- Update the draft request as needed. Use the Edit columns list to show or hide specific fields in the request.
- Click the green arrow when you're ready to submit the updated eligibility check draft.
Stedi runs the check and moves it to the list of Past checks. Stedi highlights the differences between it and other past checks so you can see a clear record of your troubleshooting efforts. You can repeat this process as many times as needed to get a successful response.
Eligibility request fields
For the best chance of success, start by sending the smallest possible set of fields in your eligibility checks. Adding extra data can lead to unnecessary rejections.
We recommend starting with the following information. Only include more if the payer requires it.
| Form section | Instructions |
|---|---|
| Payer | Select the payer where you want to send the eligibility check.
|
| Provider - Name | Most eligibility requests require the provider's name and their National Provider Identifier (NPI).
|
| Subscriber | You must include enough information for the payer to identify the patient.
|
| Dependent (optional) | A patient qualifies as a dependent for eligibility checks when they are listed as a dependent on the subscriber's insurance plan and the payer cannot uniquely identify the patient through information outside the subscriber's policy. If the patient has their own member ID (even if it only differs by a suffix like 0), you must identify them in the Subscriber section instead.
|
| Encounter - Service type codes | Select a service type code from the list. This tells the payer what kinds of benefits information you're requesting.
|
| Encounter - Date of service | Select a single service date for the request.
|
Patient information
Follow this guidance to help payers find the patient in their system.
Payer search requirements
All payers are required to be able to search for patients using the following "bare minimum" subsets of information. They will return benefits information as long as they can find a unique match for the patient within their system.
For a subscriber:
- Member ID, first name, last name, date of birth
- Member ID, last name, date of birth
- Member ID, first name, last name
For a dependent:
- Subscriber member ID, first name, last name, date of birth
- Subscriber member ID, last name, date of birth
- Subscriber member ID, first name, last name
Of course, not all of this patient information is always available. For example, a patient may forget their ID card. In these instances, some payers may still be able to search with even less information, such as the patient's first name, last name, and date of birth. Contact us if you have questions about alternative search options for a particular payer.
Dependents
The patient qualifies as a dependent for eligibility checks when:
- The patient is listed as a dependent on the subscriber's insurance plan.
- The payer cannot uniquely identify the patient through information outside the subscriber's policy.
When the patient meets these criteria, you should submit their information in the Dependent section of the form. Otherwise, you must submit their information in the Subscriber section instead.
For example, if the dependent has their own member ID number in the payer's database, you must identify them as a subscriber. This includes member IDs that differ only by a suffix, such as 01, because the patient can still be uniquely identified.
Medicaid dependents
Most Medicaid plans don't support dependents. However, some state Medicaid plans support eligibility inquiries for newborn children under 12 months old.
Children typically must be enrolled in Medicaid as a separate subscriber with their own unique member ID, even if they are legally the dependent of a parent who is a Medicaid plan member. Therefore, you'll almost always need to submit the child as a subscriber in the Subscriber section.
Sending dependent information to payers that don't support dependents will either cause an error, or the payer may ignore the information and return results for the subscriber instead.
Patient names
Note the following information and best practices when entering patient names:
- Enter the name exactly as written on the patient's insurance ID card (if available), including any special or punctuation characters such as apostrophes, hyphens (dashes), or spaces. If the patient's insurance ID card isn't available, enter the name exactly as written on a government-issued ID card. If a government ID card isn't available, enter the name exactly as given by the patient.
- Don't include a name prefix, title, rank, honorific, or academic degree in any field. These include Mrs., Dr., Hon., and PhD.
- Don't include a suffix or generation such as Jr. or III in the First name or Last name field. Put it in the separate Suffix field instead. Payers are supposed to automatically parse suffixes out of the last name, but Stedi can't guarantee that all payers will do this correctly.
- You can populate a middle name (or names) or initial in the Middle name field, but most payers ignore it when searching for the patient.
- Case doesn't matter. For example, JANE is equivalent to Jane.
The following are supported for patient names:
- Compound last and first names separated by spaces or hyphens such as Jean‐Claude or Smith Jones
- Apostrophized or elided names such as O'Connor or D'Amore
- Numbers like 3, however this typically indicates a data entry error
Some payers may have more specific requirements or restrictions that we don't cover in our docs. If you're receiving errors for a specific payer, we recommend consulting that payer's documentation for eligibility checks for additional guidance.
CMS HETS Rules of Behavior
All parties involved in eligibility transactions sent to the Centers for Medicare & Medicaid Services (CMS) eligibility system, called HETS, must comply with the HETS Rules of Behavior. Compliance is also required under our terms.
Review the Rules of Behavior before sending eligibility checks to CMS.