

Run batch eligibility checks
Batch eligibility checks are a great option as your volume grows. Stedi handles complexity like queuing and retries according to established best practices, so you don't have to. We recommend using batch checks for bulk workflows that aren't time sensitive, including:
- Monthly or weekly coverage refreshes
- Upcoming appointments
- Sets of thousands or millions of checks that can run in the background
However, batch checks have a longer feedback cycle than real-time checks because you don't receive the payer's response immediately. That's why we strongly recommend starting with real-time checks when you work with a new payer or run eligibility checks for the first time.
You can submit batch eligibility checks and Medicare Beneficiary Identifier (MBI) lookups by uploading a CSV file to the Stedi portal.
Transaction enrollment
If the provider is already enrolled for real-time eligibility checks through Stedi, you don't need to enroll again for batch eligibility checks.
Transaction enrollment is the process of registering a provider to exchange specific healthcare transactions with a payer.
Most payers don't require transaction enrollment for eligibility checks. Those that do, such as the Centers for Medicare & Medicaid Services (CMS), typically allow multiple enrollments with different clearinghouses. That means enrolling through Stedi typically doesn't cancel or interfere with any existing enrollments you have through other clearinghouses.
Enrolling through Stedi for eligibility checks also doesn't affect your existing enrollments for other transaction types. For example, enrolling with Stedi won't unenroll the provider from receiving transactions like Electronic Remittance Advices (ERAs) through other clearinghouses.
You can check whether a specific payer requires enrollment for eligibility checks in the Payer Network.
If enrollment is required, complete the following steps in the Stedi portal:
- Create a provider record with the information required for enrollment. If you already have a record for the provider, you can skip this step.
- Submit an enrollment request for real-time eligibility checks. Batch eligibility checks use the same enrollment as real-time eligibility checks.
Create new CSV batch
To create a new CSV batch:
- Go to the Batch eligibility checks page.
- Click + New batch from CSV.
- Enter a unique name for the batch. Stedi displays this name in the list of batch uploads. This name is for your reference only - we don't send it to payers.
- (Optional) Click Advanced options to configure a custom Retry duration between 8 and 24 hours. This is the maximum number of hours that Stedi retries checks in the batch that fail due to payer connectivity issues. The default is 8 hours.
- Click Create to go to the CSV upload page for your new batch.
Upload CSV file
On the CSV upload page for your batch:
-
Click Download a template to download the CSV template. You can also download it from this link: template CSV file.
-
Enter eligibility checks in the template. Each row in the template represents one eligibility check. You can submit up to 10,000 checks per CSV file. The CSV doesn't support every field in the eligibility check form, such as procedure codes. To include other fields, run a standard eligibility check with the advanced form. Visit CSV fields for what to enter in each column.
You can also submit Medicare Beneficiary Identifier (MBI) lookups through CSV upload. Set the
tradingPartnerServiceIdfor each check to eitherMBILU(for MBI lookups with SSN) orMBILUNOSSN(for MBI lookups without SSN). Then, include the required patient demographic information for each lookup. -
Click + Upload file to upload your complete CSV file.
-
Click Verify file so Stedi can validate the data in each eligibility check. You can fix any errors and re-upload the CSV file as many times as needed. When the file is error-free, you can execute the batch.
-
Click Execute batch, then click Confirm to send the eligibility checks to Stedi for processing.
Stedi processes the checks asynchronously, implementing best practices to avoid payer throttling.
CSV fields
The following tables describe the columns you can include in the CSV file. Column names are case-sensitive.
You can give each check an optional identifier:
| Column | Required | Description |
|---|---|---|
submitterTransactionIdentifier | No | An identifier from your own system, such as a patient record ID, that you can use to match each check to your records.
|
Payer
Each row must include the payer ID.
| Column | Required | Description |
|---|---|---|
tradingPartnerServiceId | Yes | The payer ID.
|
Encounter
All encounter columns are optional. If you enter a date of service, we recommend a date up to 12 months in the past or up to the end of the current month. Payers aren't required to support dates outside that range.
| Column | Required | Description |
|---|---|---|
serviceTypeCodes | No | The service type codes (STCs) for the benefits you want to check.
|
encounterDateOfService | No | The date of service, in YYYYMMDD format. If you leave it blank, the payer typically uses the current date. |
encounterBeginningDateOfService | No | For an encounter that spans multiple days, the first date of service, in YYYYMMDD format. If you enter it, you must also enter encounterEndDateOfService. |
encounterEndDateOfService | No | For an encounter that spans multiple days, the last date of service, in YYYYMMDD format. If you enter it, you must also enter encounterBeginningDateOfService. |
Provider
Each row must include the provider's NPI and name. We recommend using the name on the provider's National Plan and Provider Enumeration System (NPPES) record. Enter the name in the columns that match the provider's NPI type in NPPES: the providerOrganizationName for an organization (Type 2), or both the providerFirstName and providerLastName for a person (Type 1).
| Column | Required | Description |
|---|---|---|
providerOrganizationName | Conditional | The provider's organization name, up to 60 characters. Use this column when the provider is an organization (a Type 2 NPI). Don't enter an organization's name in providerLastName. Visit Provider name for details. |
providerFirstName | Conditional | The provider's first name, up to 35 characters, when the provider is a person (a Type 1 NPI). Enter it with the providerLastName. |
providerLastName | Conditional | The provider's last name, when the provider is a person (a Type 1 NPI).
|
providerNpi | Yes | The provider's National Provider Identifier (NPI), as 10 digits. |
providerTaxId | No | The provider's tax ID.
|
providerReferenceIdentification | No | The provider's taxonomy code. Stedi sends it to the payer as the provider's taxonomy code. Only enter it when the taxonomy code is relevant to the check, such as for a specific department of a hospital. |
Subscriber
Each row must include at least one of the subscriberMemberId, subscriberDateOfBirth, or subscriberLastName. This is only the minimum Stedi requires. When you include all four of the member ID, date of birth, first name, and last name, payers are required to return a response if the patient is in their system, so we recommend including all of them in every row.
Enter the patient's name exactly as it's written on their insurance card, including any apostrophes, hyphens, or spaces. Visit Patient information for more guidance.
| Column | Required | Description |
|---|---|---|
subscriberMemberId | Recommended | The member ID for the subscriber's insurance policy.
|
subscriberFirstName | Recommended | The subscriber's first name, up to 35 characters. We recommend including it in every row. |
subscriberMiddleName | No | The subscriber's middle name or middle initial, up to 25 characters. |
subscriberLastName | Recommended | The subscriber's last name, up to 60 characters. Don't include a suffix, such as Jr or III. Enter it in subscriberSuffix instead. |
subscriberDateOfBirth | Recommended | The subscriber's date of birth, in YYYYMMDD format. |
subscriberGroupNumber | No | The subscriber's group number, also called the group ID, up to 50 characters. |
subscriberSsn | Conditional | The subscriber's Social Security number (SSN).
|
subscriberGender | No | The subscriber's gender: M (Male) or F (Female), in capital letters. |
subscriberSuffix | No | The subscriber's personal name suffix, such as Jr, Sr, or III, up to 10 characters. Don't include professional or academic titles, such as M.D. or Ph.D. |
subscriberAddress1 | No | The first line of the subscriber's street address.
|
subscriberAddress2 | No | The second line of the subscriber's street address, such as an apartment or unit number, up to 55 characters. |
subscriberCity | No | The subscriber's city, from 2 to 30 characters. If you enter it, you must also enter the subscriberAddress1. |
subscriberAddressState | Conditional | The subscriber's state or province.
|
subscriberPostalCode | No | The subscriber's US ZIP Code or Canadian postal code, from 5 to 9 characters with no punctuation or spaces. For example, enter a ZIP+4 code as 372031234. |
Dependent
Only enter information in the dependent columns when the patient is a dependent on the subscriber's plan and the payer can't identify them without the subscriber's information. Visit Patient information to determine whether the patient qualifies as a dependent. If the dependent has their own member ID, enter the dependent's information in the subscriber columns instead. This includes member IDs that differ from the subscriber's only by a suffix, such as 01. Most Medicaid plans don't support dependents.
For a dependent, we recommend including the dependent's first name, last name, and date of birth, and the subscriber's member ID in subscriberMemberId.
Enter the dependent's name exactly as it's written on their insurance card, including any apostrophes, hyphens, or spaces.
| Column | Required | Description |
|---|---|---|
dependentFirstName | Recommended | The dependent's first name, up to 35 characters. |
dependentLastName | Recommended | The dependent's last name, up to 60 characters. Don't include a suffix, such as Jr or III. Enter it in dependentSuffix instead. |
dependentDateOfBirth | Recommended | The dependent's date of birth, in YYYYMMDD format. We strongly recommend including it. Many payers need it to identify the patient and return an error without it. |
dependentMemberId | No | Stedi doesn't send this column to the payer. Enter the subscriber's member ID in subscriberMemberId instead. |
dependentMiddleName | No | The dependent's middle name or middle initial, up to 25 characters. |
dependentSsn | No | The dependent's SSN, as 9 digits with no hyphens. Only enter it if the payer requires it. Don't use it for federally administered programs, such as Medicare. |
dependentGender | No | The dependent's gender: M (Male) or F (Female), in capital letters. |
dependentSuffix | No | The dependent's personal name suffix, such as Jr, Sr, or III, up to 10 characters. Don't include professional or academic titles, such as M.D. or Ph.D. |
dependentAddress1 | No | The first line of the dependent's street address.
|
dependentAddress2 | No | The second line of the dependent's street address, such as an apartment or unit number, up to 55 characters. |
dependentCity | No | The dependent's city, from 2 to 30 characters. If you enter it, you must also enter the dependentAddress1. |
dependentAddressState | No | The dependent's two-letter US state or Canadian province code, such as TN for Tennessee. |
dependentPostalCode | No | The dependent's US ZIP Code or Canadian postal code, from 5 to 9 characters with no punctuation or spaces. |
Portal
Only enter a portal password when the payer requires it.
| Column | Required | Description |
|---|---|---|
portalPassword | Conditional | The Provider Identification Number (PIN) the provider uses for the Medi-Cal program.
|
Provider name
Some payers return different benefits information depending on the provider name in the eligibility check, even when the National Provider Identifier (NPI) is the same. For example, when a check uses a placeholder name instead of the provider's name, a payer can return a limited set of benefits, or return out-of-network benefits instead of in-network benefits.
We recommend using the name on the provider's National Plan and Provider Enumeration System (NPPES) record. Only use a different name if you believe that the provider name on file with the payer differs from the provider name in NPPES. If the name in the check doesn't match the payer's records, the payer can return different or incomplete benefits information.
Visit Provider for which columns to use.
Character restrictions
Only use the X12 Basic and Extended character sets in request data. Using characters outside these sets may cause errors.
In addition, the following characters are reserved for delimiters in the final X12 EDI transaction to the payer: ~, *, :, ^, and >. X12 doesn't support using escape sequences to represent delimiters or special characters. Stedi returns a 400 error if you use these restricted characters improperly.
Autocorrection for backticks
Stedi automatically replaces backticks (`), also known as backquotes or grave accents, with an apostrophe (') in subscriber and dependents first and last names. These corrections prevent errors when submitting your request. Stedi returns a message in the response's warnings array when it makes this replacement.
Patient information
The following guidance uses the eligibility check form's field names. In a CSV, use the matching columns.
Follow this guidance to help payers find the patient in their system.
Payer search requirements
All payers are required to be able to search for patients using the following "bare minimum" subsets of information. They will return benefits information as long as they can find a unique match for the patient within their system.
For a subscriber:
- Member ID, first name, last name, date of birth
- Member ID, last name, date of birth
- Member ID, first name, last name
For a dependent:
- Subscriber member ID, first name, last name, date of birth
- Subscriber member ID, last name, date of birth
- Subscriber member ID, first name, last name
Of course, not all of this patient information is always available. For example, a patient may forget their ID card. In these instances, some payers may still be able to search with even less information, such as the patient's first name, last name, and date of birth. Contact us if you have questions about alternative search options for a particular payer.
Dependents
The patient qualifies as a dependent for eligibility checks when:
- The patient is listed as a dependent on the subscriber's insurance plan.
- The payer cannot uniquely identify the patient through information outside the subscriber's policy.
When the patient meets these criteria, you should submit their information in the Dependent section of the form. Otherwise, you must submit their information in the Subscriber section instead.
For example, if the dependent has their own member ID number in the payer's database, you must identify them as a subscriber. This includes member IDs that differ only by a suffix, such as 01, because the patient can still be uniquely identified.
Medicaid dependents
Most Medicaid plans don't support dependents. However, some state Medicaid plans support eligibility inquiries for newborn children under 12 months old.
Children typically must be enrolled in Medicaid as a separate subscriber with their own unique member ID, even if they are legally the dependent of a parent who is a Medicaid plan member. Therefore, you'll almost always need to submit the child as a subscriber in the Subscriber section.
Sending dependent information to payers that don't support dependents will either cause an error, or the payer may ignore the information and return results for the subscriber instead.
Patient names
Note the following information and best practices when entering patient names:
- Enter the name exactly as written on the patient's insurance ID card (if available), including any special or punctuation characters such as apostrophes, hyphens (dashes), or spaces. If the patient's insurance ID card isn't available, enter the name exactly as written on a government-issued ID card. If a government ID card isn't available, enter the name exactly as given by the patient.
- Don't include a name prefix, title, rank, honorific, or academic degree in any field. These include Mrs., Dr., Hon., and PhD.
- Don't include a suffix or generation such as Jr. or III in the First name or Last name field. Put it in the separate Suffix field instead. Payers are supposed to automatically parse suffixes out of the last name, but Stedi can't guarantee that all payers will do this correctly.
- You can populate a middle name (or names) or initial in the Middle name field, but most payers ignore it when searching for the patient.
- Case doesn't matter. For example, JANE is equivalent to Jane.
The following are supported for patient names:
- Compound last and first names separated by spaces or hyphens such as Jean‐Claude or Smith Jones
- Apostrophized or elided names such as O'Connor or D'Amore
- Numbers like 3, however this typically indicates a data entry error
Some payers may have more specific requirements or restrictions that we don't cover in our docs. If you're receiving errors for a specific payer, we recommend consulting that payer's documentation for eligibility checks for additional guidance.
Track batch status
After you submit a batch, you can track its progress on the Batch eligibility checks page. The page lists each batch with its name, date created, status, and total number of eligibility checks.
- The batch status changes to In-progress while Stedi processes the batch.
- The batch status changes to Completed when Stedi has sent all checks in the batch to payers and received responses. A completed batch can contain both successful and failed eligibility checks.
Most batches complete in 15 to 30 minutes. However, Stedi retries checks that fail due to payer connectivity issues for up to the configured retry period, so it can take up to the end of that period for all checks in a batch to return results.
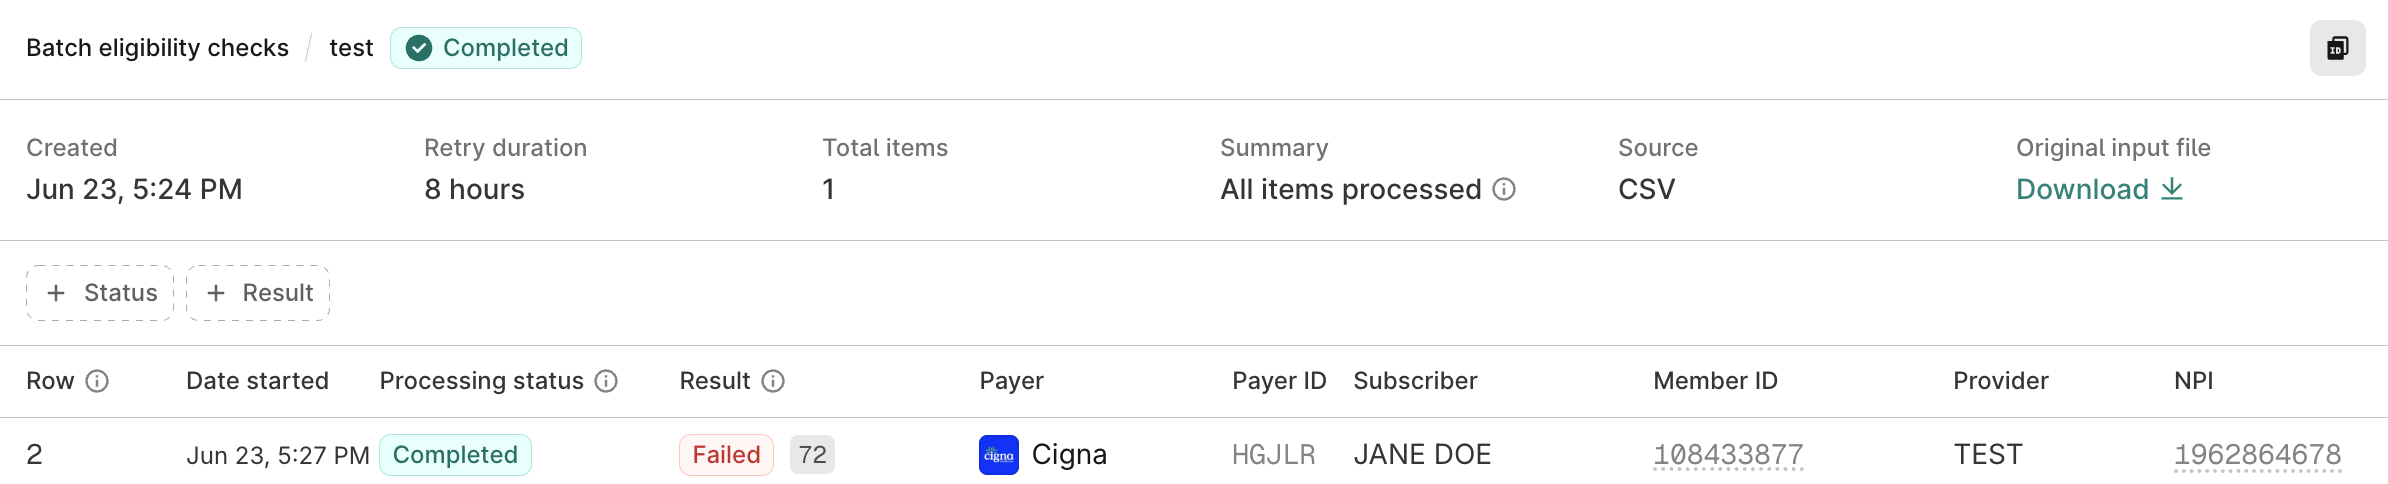
Click the batch name to view its details, including the Processing status and Result of each check. To download the original CSV file, click Download under Original input file.
Processing status versus eligibility check result
The batch details page shows a status for the batch and two statuses for each check. A completed check doesn't mean the patient has active coverage, so always review the check's Result too.
| Status | Description |
|---|---|
| Batch Status | Where the batch is in processing. It's In-progress while Stedi processes the checks and Completed when Stedi has sent all checks to payers and received responses. |
| Processing status | Where each check is in processing, such as Pending, Retrying, Completed, or Failed. It doesn't tell you whether the payer returned benefits information. |
| Result | The outcome of a completed check, based on the payer's response. Only completed checks have a result.
|
Review batch results
To review batch results:
- Go to the Batch eligibility checks page.
- Click the batch name to view its details, including the status of each check in the batch.
- Click any eligibility check to go to its details page. You can review the payer's response and any error messages, and you can edit and resubmit failed eligibility checks.
Eligibility check identifiers
Use the following identifiers to find and reference a specific check:
- Row: The batch details page lists each check's row number from your CSV file. The first check is on row 2, right after the header row.
- Eligibility check ID: The unique ID that Stedi assigns to each check. To copy it, open the check, click the copy button at the top of the page, and then click Copy eligibility check ID. You can link directly to a check in the Stedi portal with
https://portal.stedi.com/app/healthcare/eligibility/checks/{check-id}. - Outbound trace ID: The identifier Stedi sends to the payer with the check. Reference this value if contacting the payer directly about the check. To copy it, open the check, click the copy button at the top of the page, and then click Copy outbound trace ID.
Minimize waste
We recommend the following to optimize batch eligibility checks:
- Periodically purge or archive records for inactive patients. It's a waste to perform eligibility checks on patients who have died or who haven't scheduled an encounter for several years.
- Remove or deactivate patients who are no longer eligible. Look for checks with a Result of Inactive in the batch details.
Monitor for potential coverage loss
When you review the results of your batch eligibility checks, look for patients whose coverage is at risk. Open each eligibility check and check its Overview tab for the following:
- Active pending investigation in the Coverage column of the benefits table.
- A Premium paid to date before the current date. Some payers still show active coverage while the subscriber is behind on premium payments.
We recommend running additional checks on these patients because they have an elevated risk of losing coverage soon.
Costs
A batch of eligibility checks costs the same as the equivalent number of real-time eligibility checks.
For example, if you run a batch with 500 checks, it costs the same as running 500 real-time eligibility checks.